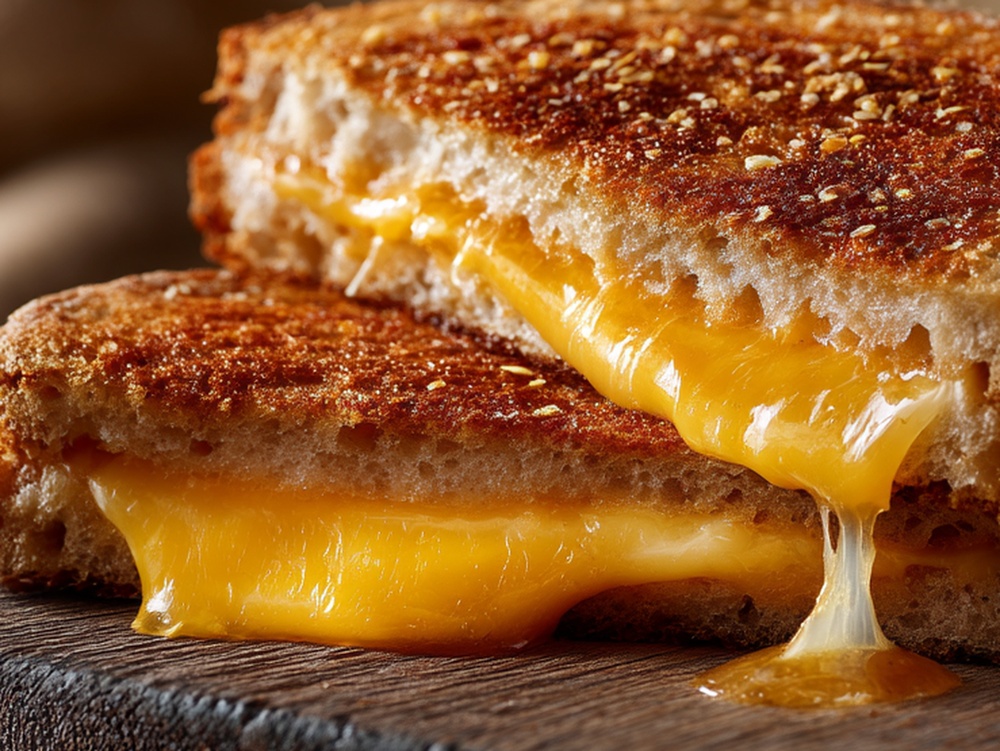
The Ultimate Grilled Cheese Sandwich Recipe

There’s something magical about biting into a perfectly grilled cheese sandwich-the crispy, golden-brown exterior giving way to melted cheese that stretches with every bite. This classic comfort food has been a beloved staple for generations, and for good reason. It’s simple, satisfying, and takes just minutes to prepare.
The beauty of a grilled cheese lies in its simplicity: quality bread, real butter, and good cheese come together to create something far greater than the sum of its parts. If you’ve been making mediocre grilled cheese sandwiches, it’s time to elevate your technique. This recipe will show you exactly how to create a restaurant-quality grilled cheese in your own kitchen, with crispy edges, creamy cheese, and perfectly toasted bread that rivals any café.
Nutrition Facts
Per 100g of grilled cheese sandwich:
- Calories: 285 kcal
- Protein: 10g
- Carbohydrates: 22g
- Fat: 18g
- Fiber: 1g
- Sodium: 510mg
*Note: These values may vary depending on the specific types of bread, cheese, and butter used.*
Ingredients
- 2 slices of bread (sourdough, white, or whole wheat)
- 2 tablespoons unsalted butter, softened
- 2-3 slices of cheese (cheddar, American, or your favorite melting cheese)
- 1 pinch of sea salt
- ½ teaspoon of black pepper (optional)
That’s it! Just five simple ingredients stand between you and grilled cheese perfection.
Step-by-Step Instructions
1. Choose Your Bread Wisely
Your bread choice sets the foundation for your entire sandwich. The best breads for grilled cheese are sturdy enough to hold up to heat without becoming soggy, yet soft enough to toast beautifully. Sourdough offers a tangy flavor and excellent structure, while classic white bread delivers that nostalgic comfort-food vibe. Whole wheat provides nuttiness and added nutrition. Avoid thin sandwich breads or anything too delicate-you want slices that are roughly ½ inch thick. A good rule of thumb is to use bread that won’t compress when you apply gentle pressure.
2. Soften Your Butter
Take your butter out of the fridge a few minutes before you start cooking. Softened butter spreads much more evenly across your bread than cold butter straight from the refrigerator. You want it soft enough to spread with ease, but not so warm that it becomes liquid. This even distribution is crucial for achieving that golden-brown crust across the entire surface of your sandwich. If you’re short on time, you can grate cold butter and let it sit on the bread for a minute or two-it will soften and spread beautifully.
3. Butter One Side of Each Bread Slice
Place your two bread slices on a clean cutting board. Spread approximately one tablespoon of softened butter on the outer side of each slice. This is the side that will touch the pan. Make sure to distribute the butter evenly from edge to edge, covering every inch of the bread. Don’t be stingy-adequate butter is what creates that gorgeous golden-brown exterior. A thin layer of butter won’t give you the results you’re after.
4. Heat Your Skillet
Place a non-stick skillet or griddle over medium heat. Allow it to heat for about 1-2 minutes. You want the pan to be hot enough that a drop of water sizzles immediately upon contact, but not so hot that the butter burns before you can arrange your sandwich. Medium heat is your friend here-it allows the cheese to melt completely while the bread toasts to perfection without burning.
5. Place the First Slice of Bread
Once your skillet is properly heated, carefully place the first slice of buttered bread onto the pan, butter-side down. You should hear a gentle sizzle. If it’s violent or the bread smokes immediately, your heat is too high-reduce it slightly. The bread should toast slowly and evenly, taking about 2-3 minutes per side.
6. Add Your Cheese
After about 2-3 minutes, when the first slice is golden brown and crispy, quickly add your cheese slices on top of the toasted bread. Use 2-3 slices depending on how cheesy you like your sandwich and how thick your cheese slices are. The residual heat from the toasted bread will begin melting the cheese immediately.
7. Top with the Second Slice
Immediately place your second slice of buttered bread on top of the cheese, with the buttered side facing outward (away from the cheese). Press down gently but firmly to help the cheese make contact with both slices of bread. This ensures even melting and helps bind your sandwich together.
8. Toast the Second Side
Allow the sandwich to cook undisturbed for another 2-3 minutes. Resist the urge to check on it constantly-this interrupts the toasting process. You’re waiting for the second slice to turn golden brown and crispy, just like the first side. You should hear gentle sizzling throughout the cooking time.
9. Perform the Flip Test
When you think the second side is done, use a thin spatula to gently lift one edge of the sandwich and peek underneath. The bread should be golden brown and crispy, not pale or soft. If it needs more time, lower it back down and cook for another 30 seconds to a minute. Once it’s golden, it’s time to flip.
10. Flip with Confidence
Here’s where many people hesitate. Use your spatula to carefully slide it completely under the sandwich. In one confident motion, flip the entire sandwich over. Don’t be timid-hesitation can cause your sandwich to fall apart. If you’re nervous, practice the motion in the air first without the sandwich on the pan.
11. Final Touches
Once flipped, allow the second side to cook for the final 1-2 minutes. At this point, peek underneath again to ensure it’s reached that perfect golden-brown color. Sprinkle a tiny pinch of sea salt on top if desired. This enhances the flavors and adds a subtle contrast to the richness of the cheese and butter.
12. Remove and Rest
Using your spatula, transfer your grilled cheese to a cutting board or plate. Allow it to rest for about 30 seconds before cutting. This brief resting period allows the cheese to set slightly, preventing it from oozing out everywhere when you cut it. The residual heat will continue cooking the cheese to the perfect consistency.
Tips for Variations or Side Dishes
Flavor Variations:
- Tomato Addition: Slice a fresh tomato and place it between the cheese layers for added freshness and acidity that cuts through the richness.
- Herb Butter: Mix fresh herbs like basil or thyme into your softened butter before spreading.
- Gourmet Cheese Blend: Combine two types of cheese, such as sharp cheddar and gruyere, for complex flavors.
- Caramelized Onions: Add a thin layer of caramelized onions for sweetness and depth.
- Jalapeño Heat: Layer thin slices of jalapeño for a spicy kick that’s perfectly balanced with the creamy cheese.
Perfect Side Dishes:
- Classic tomato soup pairs beautifully with grilled cheese-the acidity complements the richness beautifully.
- Crispy Bacon: Add a few strips of bacon to the sandwich itself for smoky, salty goodness.
- Dill Pickle Spears: The tangy crunch provides excellent textural contrast.
- Fresh Fruit: Serve with apple slices or grapes for a light, refreshing balance.
- Roasted Tomato Chips: Homemade tomato chips offer a lighter alternative to traditional sides.
Serving Suggestions
Serve your grilled cheese immediately after cooking while the cheese is still warm and melty and the bread is still crispy. Cut it diagonally-not only does this look more appealing, but it’s also easier to handle and bite into. Place it on a warm plate to maintain its temperature longer. A drizzle of honey or a small dollop of fig jam on the side adds an elegant touch if you’re feeling fancy. Pair it with a warm beverage like tomato soup, broth, or even hot chocolate for a comforting meal. If serving for lunch or dinner, add a simple side salad to make it more substantial. For best results, eat immediately-grilled cheese is best enjoyed fresh and hot.
FAQ
1. What type of cheese melts best in a grilled cheese sandwich?
American cheese is a classic choice because it’s specifically designed to melt smoothly and evenly. However, cheddar, Gruyere, Fontina, and Muenster are all excellent options. Avoid hard cheeses like Parmesan or aged cheddars, which don’t melt as readily. The best approach is to use a melting cheese that you actually enjoy eating, as the quality of the sandwich depends heavily on cheese selection.
2. Why is my grilled cheese burning on the outside but the cheese isn’t melting?
Your heat is too high. Reduce the temperature to medium or medium-low, which allows the bread to toast slowly while giving the cheese adequate time to melt. Remember, grilled cheese isn’t about speed-it’s about achieving the perfect balance between crispy bread and creamy cheese. It’s better to cook it slowly and get perfect results than to rush and end up with burnt bread and cold cheese.
3. Can I use mayonnaise instead of butter?
While some people swear by mayo for its flavor and browning properties, traditional butter is the best choice for authentic grilled cheese. Mayo can work, but it tends to brown differently and adds a distinct flavor that might overpower the delicate cheese. Stick with butter for the most reliable, consistent results that have made grilled cheese a beloved classic.
4. How do I prevent the cheese from leaking out of my sandwich?
Make sure your slices of cheese are completely enclosed within the bread-don’t let them extend past the edges. Also, press down gently when you place the top slice of bread to help the cheese adhere to both slices. Avoid using too much cheese; 2-3 slices is ideal. Finally, allow the sandwich to rest for 30 seconds after removing it from the pan before cutting or serving.
5. Can I make grilled cheese in the oven instead of on the stovetop?
Yes, you can! Butter both sides of your bread slices, place them on a baking sheet with cheese between them, and bake at 400°F for about 8-10 minutes until the bread is golden and the cheese is melted. However, stovetop cooking gives you more control and typically results in crispier bread and better texture, making it the preferred method for most grilled cheese enthusiasts.